Deep Learning - Behavioral Cloning
Teaching a Convolutional Neural Network to drive a car in a simulator.
GitHub repo
Two tracks were provided. Track 1 is the what the model is trained on with the second track being an “above-and-beyond” challenge to test how well the model generalizes.
While optional, I chose to run the simulator with higher grahics settings that included shadows to further increase the challenge.
This is part of a series of projects exploring different methods to autonomously drive a car around the given track. Others are:
Result
My model finishes both tracks without going off:
Model Architecture and Training Strategy
I tried out two existing architectures to tackle this project:
I implemented the nVidia model based on this paper: http://images.nvidia.com/content/tegra/automotive/images/2016/solutions/pdf/end-to-end-dl-using-px.pdf
Used code for the commaAI model from:
https://github.com/commaai/research/blob/master/train_steering_model.py
For both, I reduced kernel sizes to be 3x3 at most due to my much smaller input images.
From the beginning, I got more reliable results from commaAi. The nVidia model would sometimes turn “stale” at higher epoch counts, returning only one steering value for any given input.

I tested two approaches for my training data generator.
1) Per epoch, pass exactly one sample of each element in the training set to the model then reset and move on to next epoch 2) Pass a randomly chosen element of the training set to the model continuously and play with the number of samples per epoch
I got better, more reliable training results from approach 2. It made even more sense to stick to the random generator after adding preprocessing steps that are based on randomness (brightness and shadows) - the images are now somewhat unique regardless of whether the generator sends duplicates.
Since validation data did not seem like a reasonable measure of the performance of the model, I simply ran many wedges of different settings and tested on the track itself.
In the end, my most successful model trained for 10 epochs on 20.000 samples per epoch with a batch size of 64.
Approach
I started out with only the Udacity data, trying to get the car to safely drive around the track at least once with the published baseline data. Once I achieved that, I added my own data and gradually introduced more preprocessing steps as outlined below in order to improve two things:
- Smoothness of the drive
- Prevent overfitting, defined by good performance on Track 2
I used a tweaked version of established nVidia and commaAI CNN models on scaled down images of the training set (64x64x3).
Data Preprocessing:
I added a few steps to augment the recorded data (in order):
- Cropping
Implementation: I cropped a little more than the top fifth of the image as well as the bottom to remove the car’s hood and the sky from the image. This yielded a generally smoother ride around track 1 due to higher density of useful information in the images.
Result: More reliable drive
- Scaling
Implementation: Images were scaled to 64x64 pixels. This seemed safe to do since the simulator creates clean, synthetic images with little complexity to begin with.
Result: Much faster training times
- Filter out steering angles close to zero
Reason: Data of a car going around Track 1 will be skewed towards going straight since much of the track doesn’t require steering input.
Implementation: Steering angles close to zero are ignored according to a given probability. I arrived at a factor of 0.5 at the end.
Result: Better lane keeping through curves
- Flipped data
Reason: Recording of a car going around Track 1 will be skewed towards making left turns.
Implementation: All images in the dataset are flipped and the corresponding steering angle is inverted
Result: More reliable drive (less swerving, less “close calls”)
- Randomize brightness and add artificial shadows
Reason: My model would tend to swerve around shaded areas, clearly identifying them as hard road boundaries. It would also start behaving unpredictably when entering and exiting entirely dark areas of Track 2.
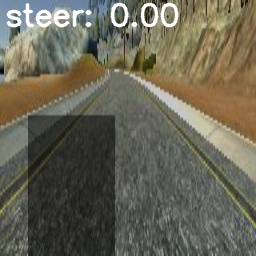
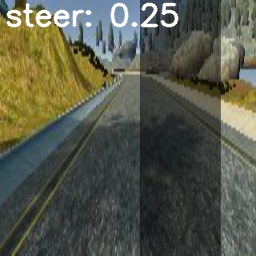
Implementation: Brightness of the entire image is scaled randomly between 0.25 and 1.25. Additionally, artificial “shadows” are added simply as a rectangle of darkness that is blended into the original image. Shadows in the game world are fairly simple geometrically, and sticking to an even simpler rectangle shape helped the model enough to be less sensitive to shadows.
Result: Car drives more predictably through shady areas. After this augmentation, my model started being able to navigate Track 2 in it’s entirety.
Sample images
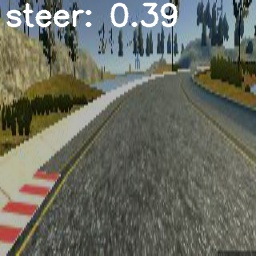
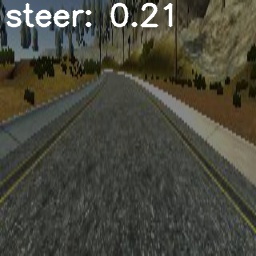
The following represent sample images used in the model. For better visualization, the steering angle is overlayed and they are 256x256 instead of 64x64.
 Flipped Image
 Left camera with reduced Brightness (center steer angle would be -0.04)
 Center camera with added random shadow
 Left camera image with added shadow
Data normalization
Carried out in the first layer of the Keras model and simply scales the RGB values to be between -1.0 and 1.0.
Training Data
I created a lot of my own data, including smooth laps around the track as well as recording individual recoveries from bad states to the right and left of the track - all at reduced speed in order to make sure the entire track is evenly sampled.